How to identify a leaking truck gasket
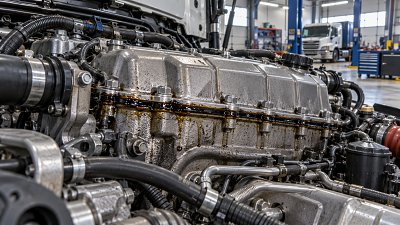
A leaking truck gasket is best identified by tracing fresh fluid or combustion residue back to a sealing joint, then checking whether the leak is actually coming from that joint. Oil on an oil pan, coolant around the front of an engine, or soot near an exhaust manifold can point you in the right direction, but none of these signs alone proves that the gasket has failed.
For maintenance personnel, the first decision is whether the truck can be inspected safely or needs to be taken out of service immediately. A minor oil seep may leave a damp film without a measurable drop in level. Active dripping, a coolant leak accompanied by overheating, or exhaust escaping into the cab area calls for a more urgent response. In every case, confirm the source before ordering parts or dismantling a component.
Start with the fluid and the operating symptoms
Identify what is leaking and note when the symptoms occur. A gasket may leak only when a system is hot, pressurized, or operating under load. Fluid collected beneath a parked truck therefore gives you a starting area, not a definitive diagnosis.
- Engine oil: Usually leaves a slippery film that may be amber, brown, or black. Common areas to examine include the valve cover, oil pan, engine front cover, and joints around oil filter housings.
- Coolant: May leave a wet trail, dried deposits, or staining around a joint. Its color varies by formulation and condition, so check the cooling system and maintenance records rather than relying on color alone.
- Transmission or power steering fluid: Can travel along the chassis and collect away from the source. Confirm the fluid by checking the relevant reservoir, service history, and components above the wet area.
- Exhaust gas: Often leaves black soot near a manifold or pipe joint. A ticking or puffing sound, especially during a cold start, can help locate the area, although cracked components and loose connections can produce similar symptoms.
Record fluid levels, the rate of loss, and the conditions under which the leak appears. Note whether the truck was idling, working under load, cooling down, or parked overnight. On a fleet vehicle, compare the observation with the driver’s report and recent service work. A leak that appeared after a repair may involve a disturbed hose, fitting, or mounting surface as well as the gasket itself.
Do not assume every wet gasket line requires immediate replacement. A light, stable seep and an active leak have different consequences. Assess the amount of fluid lost, where it is going, and whether it can reach hot exhaust parts, belts, brakes, tires, or electrical connections. Follow the fleet’s defect reporting and service criteria when deciding whether the vehicle can remain in operation.
Make the truck safe before looking for the source
Park on level ground, secure the vehicle, and follow the shop’s isolation procedures. Allow hot components to cool before working near the exhaust, cooling system, or pressurized fluid systems. Never remove a cooling-system pressure cap while the system is hot or pressurized.
Use suitable eye and hand protection, and support the vehicle correctly if access underneath is necessary. If the engine must run during diagnosis, keep clear of fans, belts, and other moving parts. Use appropriate exhaust extraction and follow the manufacturer’s procedure for any test requiring a running engine.
High-pressure fluid leaks require particular care. Do not use a hand to feel for a suspected pressurized leak; fluid injection injuries can be serious even when the visible wound is small. Use the equipment manufacturer’s prescribed inspection method and depressurize the system before disconnecting components.
Trace the leak to its highest fresh point
Oil and coolant can spread across a surprisingly large area. Airflow while driving, vibration, gravity, and rotation from fans or pulleys can carry fluid away from the original leak. An oil pan flange may be wet because oil is running down from a valve cover, while a coolant trail on an engine block may begin at a hose connection above it.
Begin with a visual inspection before cleaning. Look for wet tracks, staining, accumulated dirt, and the direction in which fluid has traveled. Photograph the area if the leak pattern is difficult to follow or if another technician will continue the job. Check nearby hoses, clamps, plugs, fittings, filters, seals, and component housings at the same time.
Next, clean the accessible area with a product suitable for the surfaces and components involved. Avoid forcing water or cleaning chemicals into electrical connectors, intake openings, or other sensitive areas. Once the area is dry, operate the truck under safe, controlled conditions appropriate to the suspected system. Reinspect with a light and mirror, working from the highest fresh wet point downward.
If access is restricted, an inspection camera can help reveal the back of an engine or the upper side of a housing. A compatible leak-detection dye and lamp may also help with an intermittent fluid leak, provided the dye is approved for the system and used according to the vehicle and product instructions. Dye shows where fluid travels; it does not by itself establish that a gasket, rather than an adjacent seal or fitting, is defective.
Pay attention to the joint itself. Fresh fluid emerging along the interface between two components is stronger evidence of a gasket leak than fluid merely covering the outside of one component. Even then, check for a cracked housing, damaged sealing surface, loose fastener, or fluid entering the joint area from above.
Check the common gasket locations
Valve cover and upper engine joints
A valve cover gasket leak often shows as oil collecting around the cover perimeter and running down the side of the engine. Oil may reach the exhaust side and create a burning smell or visible smoke from the exterior of the engine. Inspect the full perimeter, particularly less visible areas at the rear and around corners.
Before condemning the gasket, check oil filler caps, breather connections, and nearby oil lines. A crankcase ventilation problem or excessive crankcase pressure can push oil past seals and gaskets. Replacing the cover gasket without investigating abnormal pressure may leave the underlying problem unresolved.
Oil pan and lower engine joints
Fresh oil along the pan-to-block joint can indicate a leaking oil pan gasket or sealing compound, depending on the engine design. However, oil from a front cover, rear seal area, filter housing, or upper engine joint may collect at the pan and drip from its lowest edge.
Clean and trace the oil downward before removing the pan. Also inspect the drain plug, its sealing washer, the pan itself, and any nearby oil lines. Impact damage or a distorted flange can prevent a new gasket from sealing properly.
Coolant joints and housings
Coolant around a thermostat housing, water outlet, pump mounting area, or other sealed joint may indicate a gasket or seal leak. Look for a fresh wet edge or dried residue at the joint, then inspect hoses and clamps above it. A water pump can also leak from its own seal or housing, so coolant near the pump does not automatically identify the mounting gasket as the failed part.
A cooling-system pressure test can help reveal an external leak that is difficult to see during normal operation. Perform it on a cooled system using the correct adapter and the vehicle manufacturer’s specified procedure and pressure limits. Observe the entire suspected area during the test; a pressure drop establishes a loss of pressure but does not identify the leak location by itself.
Exhaust manifold joints
A failed exhaust manifold gasket may leave a concentrated soot trail at the joint between the manifold and cylinder head. Listen for a sharp ticking or puffing sound, bearing in mind that some leaks become less obvious as components warm and expand. Inspect for loose or damaged fasteners, a cracked manifold, and leaks at nearby exhaust connections.
Do not place hands near a suspected exhaust leak on a running engine. Exhaust components become extremely hot, and escaping gases can cause injury. If fumes are entering the cab or the exhaust system has a significant leak, remove the truck from service and repair it before further operation.
Recognize when the head gasket needs testing
A head gasket can leak externally, but it can also allow combustion gases, coolant, or oil to move between passages or into a cylinder. Possible warning signs include unexplained coolant loss, repeated overheating, persistent bubbles in the cooling system, abnormal exhaust vapor after warm-up, or contamination visible in the oil or coolant. These symptoms deserve investigation, but each has other possible causes.
For example, coolant in engine oil can also result from a failed oil cooler or another internal defect. White exhaust vapor can have causes other than coolant entering a cylinder. Likewise, a pressurized cooling system does not on its own prove a head gasket failure; pressure is normal as the system warms.
Use the engine manufacturer’s diagnostic sequence to narrow the fault. Depending on the engine and symptoms, this may include a cooling-system pressure test, a combustion-gas test at the cooling system, cylinder compression or leak-down testing, and inspection of the oil cooler or other components. A test result should be interpreted alongside the operating symptoms and other findings. A negative result may not rule out an intermittent leak under load, while a positive result still requires determining where the internal fault is located.
Stop operating an overheating engine and allow it to cool. Continuing to drive can turn a seal failure or cooling-system defect into more extensive engine damage. Where internal leakage is suspected, document the symptoms and test results before authorizing major disassembly.
Separate the gasket from the cause of failure
Once the leak is traced to a sealed joint, inspect the joint and its surrounding components before deciding on the repair. A gasket can deteriorate with heat and service time, but a replacement may leak again if the surfaces are distorted or the joint is assembled incorrectly.
- Check for damaged, loose, missing, or incorrectly installed fasteners.
- Inspect accessible sealing surfaces for corrosion, scratches, contamination, and distortion.
- Look for cracks in covers, housings, and adjacent components.
- Check for abnormal system pressure, blocked breathers, or cooling-system faults where relevant.
- Confirm whether the joint uses a formed gasket, sealant, an O-ring, or a combination specified by the manufacturer.
Avoid tightening bolts simply because a joint is wet. Excessive torque can distort a cover or flange, damage threads, or worsen the leak. If a fastener check is appropriate, use the specified sequence and torque for that joint. Do not add sealant unless the repair procedure calls for it; excess sealant can interfere with sealing or enter internal passages.
After repair, refill or top up the affected system as required and check for leaks under the prescribed operating conditions. Reinspect after the truck has reached operating temperature and again after a suitable service interval. Record the original symptoms, confirmed source, work performed, and final fluid levels so that any recurrence can be assessed against a clear baseline.
Trending News
- How to identify a leaking truck gasket
- China Raises Fuel Prices, Capping Increase to Ease User Costs
- How to compare delivery truck suppliers by total cost of ownership
- EU Truck Registrations Rise 7.5% as Plug-In Heavy Trucks Gain 59% in First Nine Months
- How to vet a semi-trailer manufacturer's parts support for your fleet
Tag
Recommended News
 Truck Parts IndustryHow to identify a leaking truck gasketLearn how to identify a leaking truck gasket, trace oil, coolant or exhaust leaks to their source, and make safer, more confident repair decisions.
 Truck Parts IndustryWhat causes a truck injector to fail prematurely?Truck injector failure can stem from fuel contamination, water, wiring faults, heat, or incorrect installation. Discover practical diagnostic steps to prevent repeat repairs.
 Truck Parts IndustryEU REACH Rule Takes Effect for Truck Rubber PartsEU REACH Rule takes effect for truck rubber parts exported to the EU. Learn how SCIP reporting, SVHC declarations, and supply chain compliance now impact truck manufacturers and suppliers.
 Truck Parts IndustryHow to Evaluate Commercial Vehicle Parts With Eco-Friendly Materials for Durability and ComplianceCommercial vehicle parts with eco-friendly materials require more than green claims. Learn how to assess durability, compliance, and supplier reliability for smarter sourcing.
 Truck Parts IndustryHow to Evaluate a Truck Parts Supplier Beyond Unit PriceTruck parts supplier selection should go beyond unit price. Learn how to assess quality, traceability, compliance, delivery, and support to reduce fleet risk and total cost.
 Truck Parts IndustryVietnam to Require QR Traceability Labels on Imported Heavy-Truck PartsVietnam to Require QR Traceability Labels on Imported Heavy-Truck Parts from Aug 1, 2026. Learn scope, VNQR-2025 rules, VITRAC links, and how to avoid port refusal and fines.
 Truck Parts IndustryHow to Evaluate a Truck Spare Parts Supplier for Long-Term Cost ControlTruck spare parts supplier selection affects far more than price. Learn how to compare quality, delivery, traceability, and hidden costs to protect fleet uptime and control long-term expenses.
 Truck Parts IndustryFuel Injection Pump Failure Signs and What They Mean for Engine PerformanceFuel injection pump failure signs can quickly reduce truck power, raise fuel use, and trigger hard starts. Learn what each symptom means and when to act before costly downtime.
 Truck Parts IndustryExcavator Attachment Selection for Demolition and Site PrepExcavator attachment selection for demolition and site prep: compare breakers, grapples, crushers, and buckets to boost productivity, safety, and ROI.
 Truck Parts IndustryTruck Engine Overhaul or Replacement: Which Costs Less Long Term?Truck engine overhaul or replacement? Compare long-term cost, downtime, fuel efficiency, and reliability to choose the smarter option for your fleet.
 Truck Parts IndustryHow to Choose Excavator Parts That Last LongerExcavator parts buying guide: learn how to choose excavator parts that last longer by comparing fit, material quality, operating conditions, and supplier reliability.
 Truck Parts IndustryAre Eco-Friendly Commercial Vehicle Parts Durable Enough for Daily Use?Commercial vehicle parts with eco-friendly materials can be durable for daily use—if tested right. Explore where they perform best, key risks, and smarter sourcing insights.
 Truck Parts IndustryTruck Parts OEM vs Aftermarket: Cost, Fit, and Warranty RisksTruck parts OEM vs aftermarket: compare true cost, fit accuracy, and warranty risks to reduce downtime, avoid disputes, and make smarter fleet sourcing decisions.
 Truck Parts IndustryTruck Spare Parts Buying Guide: How to Reduce Downtime and Fitment RiskTruck spare parts buying guide for fleet maintenance teams: learn how to reduce downtime, avoid fitment risk, verify suppliers, and make smarter sourcing decisions.
 Truck Parts IndustryHow to Evaluate a Truck Parts Supplier Beyond PriceTruck parts supplier selection should go beyond price. Learn how to compare quality, delivery, service, and total cost to reduce risk and keep fleets running efficiently.
 Truck Parts IndustryHeavy Truck Parts for Construction: Signs of a Reliable ManufacturerHeavy truck parts manufacturer for construction: learn how to identify reliable suppliers through quality control, traceability, testing, and support to reduce downtime and improve fleet safety.
 Truck Parts IndustryHow to Compare Truck Spare Parts Suppliers on Quality and Lead TimeTruck spare parts supplier comparison starts with quality and lead time. Learn how to assess consistency, delivery reliability, and sourcing fit for smarter purchases.
 Truck Parts IndustryEU REACH Sets PAH Limit for Heavy Truck Rubber PartsEU REACH sets a new PAH limit for heavy truck rubber parts, affecting brake hoses, bushings, and export compliance. Learn what suppliers must prepare now to avoid testing delays and customs risks.
 Truck Parts IndustryWhat to Check in a Truck Chassis Supplier Before Fleet ExpansionTruck chassis supplier selection can make or break fleet expansion. Learn what to check on quality, production, delivery, support, and total cost before requesting a quote.
 Truck Parts IndustryCold Storage Truck Parts That Matter Most for Temperature ControlCommercial vehicle parts for cold storage determine real temperature stability. Discover the key truck components that reduce spoilage, improve efficiency, and protect sensitive cargo.
 Truck Parts IndustryHow to Evaluate a Heavy Truck Parts Manufacturer for Long-Term Supply StabilityHeavy truck parts manufacturer selection starts with supply stability. Learn how to assess quality, capacity, lead times, and risk signals for smarter long-term sourcing.
 Truck Parts IndustryEU EPR Rules Extend to Commercial TrailersEU EPR rules now extend to commercial trailers, bringing new registration, reporting, and fee duties from 2027. See how exporters can prepare early to avoid customs delays.
 Truck Parts IndustryTruck Suspension Problems: Signs, Causes, and Fix OptionsTruck suspension issues can lead to tire wear, poor handling, and costly downtime. Learn the key signs, root causes, and best fix options for different truck applications.
 Truck Parts IndustryHow to Choose a Heavy Truck Parts Manufacturer for Construction FleetsHeavy truck parts manufacturer for construction selection starts with uptime, quality, and delivery. Learn how to compare suppliers, reduce fleet risk, and choose with confidence.
 Truck Parts IndustryUS Sets AEBS Rule for Imported Commercial TrailersUS sets AEBS rule for imported commercial trailers starting Oct. 1, 2026. Learn FMVSS No. 127A, SAE J2929, and key compliance steps to avoid CBP entry denial.