How to diagnose overheating in a military truck
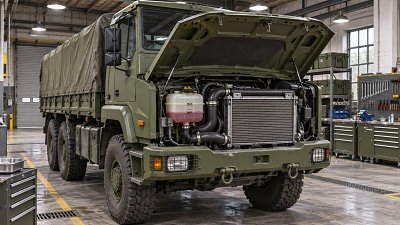
Overheating in a military truck is not always caused by a failed radiator or water pump. A blocked cooling pack, insufficient coolant, poor fan engagement, trapped air, or an engine operating outside its intended conditions can produce similar symptoms. The most efficient diagnosis starts by confirming that the engine is genuinely too hot and identifying the conditions under which the temperature rises.
Do not continue operating an engine that has reached its specified shutdown temperature or is venting coolant. Stop in a safe location and follow the vehicle’s shutdown procedure. Allow the system to cool before removing a pressure cap or disconnecting a hose; hot coolant can remain pressurized after the engine stops.
Confirm the temperature before replacing parts
Record the dashboard reading, warning messages, operating conditions, and any diagnostic trouble codes. Where the vehicle has electronic engine controls, compare the instrument reading with the coolant temperature reported by the engine control module. A substantial difference points toward a gauge, sensor, wiring, or communication problem, but it does not by itself prove which component is faulty.
An infrared thermometer can provide a useful comparison at the thermostat housing or another accessible coolant passage. Its reading is a surface temperature, not the coolant temperature itself. Paint, surface condition, measurement angle, and distance affect the result, so use it to compare locations and trends rather than as an exact substitute for a calibrated sensor.
Use the engine and vehicle service information to establish the normal operating range, thermostat operation, fan-control strategy, and warning thresholds. A temperature that would be abnormal on one engine may be expected on another, particularly during a controlled fan-engagement cycle. If the warning is confirmed, note whether it occurs at idle, during a long climb, at road speed, or only after the engine is shut down. That pattern helps separate airflow, coolant-flow, and load-related faults.
Inspect the cooling system when cold
With the vehicle secured and the engine cool, check the coolant level at the specified inspection point. Some systems use a pressurized expansion tank rather than a conventional radiator cap; the correct checking method depends on the installation. A low level is a symptom that requires investigation, not a complete diagnosis.
Look for wetness, dried coolant residue, staining, or damaged components around the radiator tanks, hose joints, water pump, heater circuit, expansion tank, and drain points. Inspect the underside of the engine and chassis as well. A leak can appear away from its source when coolant travels along a hose, guard, or frame member.
Check hoses for soft spots, cracking, abrasion, kinks, loose clamps, and signs of internal collapse. A hose may look acceptable while cold and still restrict flow under operating conditions. Pay particular attention to hoses routed close to armor, brackets, or field-installed equipment, where movement can cause rubbing or a tight bend.
Confirm that the coolant is the type specified for the engine and that its concentration is appropriate for the operating environment. Do not assume that mixing products of the same color is acceptable. Incorrect coolant, excessive water, contamination, or incompatible additives can reduce protection and contribute to deposits or component damage. If the coolant is dirty, oily, or contains unusual sediment, investigate the source before simply replacing it.
Use pressure testing to find losses
A cooling-system pressure test can reveal leaks that are not obvious during a cold visual inspection. Fit the correct adapter and apply pressure only up to the limit specified by the vehicle or component manufacturer. Watch the gauge and inspect joints, cores, tanks, and the water-pump area. A falling pressure reading indicates a loss, but it does not identify its location: check the tester and adapter for leakage before condemning the engine.
Test the pressure cap separately where the equipment and service procedure permit. A cap that cannot maintain its specified pressure can allow coolant to escape at a lower temperature than intended. A replacement must match the specified pressure rating and physical configuration; fitting a higher-pressure cap is not a remedy for an overheating system and can damage components.
If pressure falls without an external leak, consider an internal leak only after checking accessible circuits and test equipment. Coolant in the oil, persistent unexplained coolant loss, or combustion gases in the cooling system justify further testing. None of these observations alone should be used to order a head gasket or cylinder-head repair without following the engine manufacturer’s diagnostic procedure.
Check whether heat can leave the cooling pack
Overheating at low vehicle speed, during idling, or on a slow climb makes airflow a priority. Inspect the complete cooling stack, not just the visible face of the radiator. Mud, dust, seeds, and debris can accumulate between the charge-air cooler, condenser, oil cooler, and radiator, where a surface inspection may miss them.
Clean according to the equipment manufacturer’s instructions. Excessive pressure or an unsuitable spray angle can flatten fins and make airflow worse. Where access is limited, follow the specified procedure for separating or opening the cooling pack. Check that protective screens, louvers, and any adjustable shutters are clean and operating as intended.
Inspect the fan shroud, seals, and baffles. Missing or damaged pieces can allow air to bypass the radiator instead of passing through the core. This matters especially on a vehicle modified with additional guards or equipment: a clear radiator face does not guarantee that the required airflow path remains intact.
Fan engagement must be checked against the actual control system. A mechanical fan, viscous clutch, electrically controlled clutch, hydraulic fan, and electric fan have different operating characteristics. Use commanded and actual fan data where available, and check the relevant power supply, control circuit, hydraulic components, or clutch operation as specified. Do not infer that a fan is faulty merely because it turns freely or slowly when the engine is cold.
Keep clear of the fan and belts during any running checks. Fans can engage automatically and without warning. Do not reach into the cooling pack, remove guards, or attempt to stop a rotating fan by hand. Shut down, isolate, and secure the vehicle before close inspection or repair.
Determine whether coolant is circulating
If airflow is adequate and the coolant level is correct, investigate restrictions and circulation. A thermostat stuck closed or opening incompletely can prevent sufficient flow through the radiator. A thermostat stuck open creates a different problem, generally delaying warm-up, and should not be assumed to explain every high-temperature complaint.
Compare temperatures at the thermostat housing and radiator inlet and outlet as the engine warms, using the manufacturer’s expected operating behavior as the reference. A temperature difference across the radiator indicates heat transfer, but there is no universal acceptable difference: load, ambient conditions, fan operation, and system design all affect it. A large difference can suggest inadequate coolant flow; a small difference can occur when heat is not being rejected effectively or when the operating conditions do not require much cooling.
An infrared scan across the radiator core can help identify uneven temperature patterns. A localized cool area may indicate an internal blockage, but it can also result from airflow differences or the radiator’s internal flow arrangement. Confirm the suspicion with the applicable flow, pressure-drop, or component inspection procedure before replacing the radiator.
Inspect the water-pump drive and belt condition, including routing, tension, glazing, contamination, and tensioner operation. On some engines, the pump can leak or suffer impeller damage even when the pulley turns. Conversely, replacing a pump solely because the engine overheats is poor diagnosis. Check for evidence of leakage, abnormal bearing condition, drive faults, and the circulation tests specified for that engine.
Air trapped after a coolant change or repair can interrupt circulation and create unstable temperature readings. Refill and bleed the system using the approved method and the correct fill points. Some installations require a vacuum filling device or a specific sequence for heater and auxiliary circuits. After the engine has cooled, recheck the level and inspect for leaks; a persistent need to add coolant requires further investigation.
Match the symptom to the operating condition
Temperature rises mainly at idle or low speed: prioritize the fan, fan controls, shroud, cooling-pack cleanliness, and any shutter or airflow obstruction. Low coolant and trapped air remain possible, so verify them before concentrating on the fan.
Temperature rises on climbs or under sustained load: check coolant level, radiator condition, fan engagement, coolant circulation, and the actual operating load. Restricted airflow can still be responsible even when the truck is moving. Confirm that the correct gear and engine-speed range are being used; lugging the engine can increase thermal stress while reducing the effectiveness of engine-driven cooling components.
Temperature rises at road speed as well as at idle: consider a significant cooling-pack restriction, coolant-flow problem, low coolant, incorrect thermostat, or a combustion-related fault. Use the test results to narrow the possibilities rather than treating this pattern as proof of one failed part.
Temperature fluctuates sharply: inspect the coolant level, bleeding, sensor connections, and wiring. A sudden gauge movement can be electrical, while an actual temperature swing may result from intermittent circulation or changing fan operation. Compare the gauge, control-module data, and independent measurements before deciding.
Coolant is expelled or pressure builds abnormally: investigate the cap, coolant level, overheating cause, and possible combustion-gas entry. Perform a suitable combustion-gas test or other manufacturer-approved checks, recognizing that a negative result under one set of conditions does not necessarily eliminate an intermittent fault.
Consider engine and vehicle changes
A cooling system in good condition can still be overwhelmed if the engine is producing abnormal heat or the vehicle configuration restricts its cooling capacity. Check for relevant engine fault codes, intake or exhaust restrictions, and other conditions identified in the engine service information. A restricted charge-air cooler or an exhaust restriction, for example, requires its own diagnosis; neither should be declared the cause from coolant temperature alone.
Compare the current configuration with the approved installation. Added armor, winches, protective grilles, auxiliary coolers, or repairs to body panels can alter the path of air through the cooling pack. Also check whether the radiator, fan, thermostat, and pressure cap are correct for the engine and vehicle variant. Components that fit physically are not necessarily equivalent in flow capacity or control characteristics.
Consider the actual operating conditions when reproducing the fault. Ambient temperature, altitude, payload, towing, terrain, and low-speed operation affect cooling demand. A truck that remains within its specified temperature range on level ground may still reveal a restriction during a sustained climb. Reproduce the complaint only within authorized operating limits and with a safe means of stopping the test.
Verify the repair under the original conditions
After repairing the identified fault, refill and bleed the system as specified, clear codes where appropriate, and check for leaks. Confirm fan operation and monitor coolant temperature using the same sources used during diagnosis. A stationary warm-up is useful for detecting immediate leaks or control faults, but it may not reproduce an overheating complaint that appears only under load.
Where safe and authorized, repeat a duty cycle representative of the original complaint while monitoring temperature, warnings, fan behavior, and coolant loss. Stop the test if the specified limit is approached. Once the engine has cooled, recheck the coolant level and the repaired connections. Record the original symptom, test results, parts changed, coolant used, and verification conditions so that a recurring fault can be investigated without repeating unsupported parts replacements.
Trending News
- How to diagnose overheating in a military truck
- ACEA and SMMT Urge Joint Action on Trade Barriers Ahead of EU–UK Summit
- How to choose a cement spreader truck for soil stabilization
- CAAM: October Commercial Vehicle Sales at 354,000; Heavy Trucks Up 10% in Jan–Oct
- How to choose the right truck spreader capacity for road salting
Tag
Recommended News
 Truck TechnologyHow to diagnose overheating in a military truckDiagnose military truck overheating with a practical guide to coolant, airflow, fan and circulation checks. Find the cause and verify repairs safely.
 Truck TechnologyHow to locate a truck exhaust system leak before replacing partsLocate a truck exhaust system leak before replacing parts. Learn how to spot soot trails, confirm leaks safely, and identify root causes to avoid costly guesswork and repeat repairs.
 Truck TechnologyDoes a cab chassis truck for fire department have enough frame capacity?Cab chassis truck for fire department: assess frame strength, axle loads, tank weight, stability and compliance for a safer, reliable fire apparatus build.
 Truck TechnologyWhen does a truck off road setup need locking differentials?Truck off road setups need locking differentials when uneven, low-grip terrain causes wheelspin. Learn how to choose the right axle locks for safer, reliable mobility.
 Truck TechnologyEPA Remote-Diagnostics Rules Take Effect for Diesel EnginesEPA Remote-Diagnostics Rules take effect for diesel engines sold in the U.S. Learn how OTA updates, real-time NOx reporting, and fault-code retention may impact compliance, OEM projects, and imports.
 Truck TechnologyCab Chassis Truck for Military Use: Key Specs That Affect Mission ReadinessCab chassis truck for military use: explore the key specs that drive mission readiness, off-road mobility, integration flexibility, and lifecycle support for smarter fleet decisions.
 Truck TechnologyBULLDOZER with GPS Tracking: What Improves on Remote Job SitesBULLDOZER with GPS tracking improves remote job sites with better visibility, reduced idle time, stronger fleet coordination, and smarter earthmoving decisions across harsh terrain.
 Truck TechnologyTruck Body Materials Compared: Steel, Aluminum, or Composite?Truck body material comparison made practical: explore steel, aluminum, and composite options for payload, durability, corrosion resistance, and lifecycle cost.
 Truck TechnologyBest Cab Chassis Truck Setups for Municipal Engineering TasksCab chassis truck for municipal engineering: compare the best setups for sanitation, tanker, utility, and dump tasks to improve uptime, safety, and long-term fleet value.
 Truck TechnologyTruck Electrical System Faults: Common Causes and Fast ChecksTruck electrical system faults can cause no-starts, dim lights, and costly downtime. Learn common causes, fast checks, and practical steps to diagnose issues quickly.
 Truck TechnologyASEAN-ICV Opens Mutual Access for Connected Heavy VehiclesASEAN-ICV opens mutual access for connected heavy vehicles, cutting duplicate V2X testing across Thailand, Vietnam, Indonesia, and Malaysia. See what it means for exports, compliance, and fleet delivery.
![]() Truck TechnologyTruck Concrete Mixer Basics: Capacity, Drum Type, and Jobsite FitTruck concrete mixer basics explained: compare capacity, drum type, and jobsite fit to improve pour efficiency, cut delays, and choose the right mixer truck with confidence.
 Truck TechnologyBrazil Requires Dual-Mode Tracking on Imported Heavy TrucksBrazil requires dual-mode tracking on imported heavy trucks. Learn how BeiDou+GPS, SISFROTA, and ABNT NBR 16501:2025 rules affect licensing, compliance, and market access.
 Truck TechnologyWater Truck OEM Options: Tank Size, Pump Output, and Road ConditionsWater truck OEM selection starts with the right match of tank size, pump output, and road conditions. Learn how to compare specs, improve uptime, and choose a fleet-ready solution.
 Truck TechnologyChile Requires Remote Diagnostics on Imported Heavy TrucksChile Requires Remote Diagnostics on Imported Heavy Trucks: learn how NCh3871:2026, OTA, ISO 22161, and VHMP rules will impact truck imports, registration, and fleet planning.
 Truck TechnologyHow to Compare Logging Truck OEM Specs for Drivetrain and Load StabilityLogging truck OEM specs compared the right way: learn how to evaluate drivetrain torque, axle ratios, suspension, and load stability for safer forestry hauling.
 Truck TechnologyIndia Drafts BS-VI Phase II Remote OBD Upload RuleIndia Drafts BS-VI Phase II Remote OBD Upload Rule: learn how India’s new real-time OBD upload proposal could impact truck exporters, T-Box upgrades, certification timelines, and market access.
 Truck TechnologyMilitary Truck Payload vs Mobility: What Matters in Harsh TerrainMilitary truck performance in harsh terrain depends on more than payload. Discover how mobility, traction, axle load, and suspension affect real-world mission success.
 Truck TechnologyLogging Truck OEM Options: Key Specs for Harsh Forestry RoutesLogging truck OEM options for forestry routes: compare axle layouts, frame strength, traction, braking, and service support to choose a durable, high-uptime truck.
 Truck TechnologyVietnam to Require VCA Checks for Imported Heavy TrucksVietnam to Require VCA Checks for Imported Heavy Trucks from August 1, 2026. Learn how VCA testing, CAN, HVIL, and OBD-II rules could impact truck exports, certification, and delivery planning.
 Truck TechnologyMexico Enforces CAN FD Rule for Imported TrucksMexico Enforces CAN FD Rule for Imported Trucks: learn how NOM-042-SEMARNAT-2026 impacts OBD-II+, ANCE verification, ECU strategy, and Mexico-bound truck compliance.
 Truck TechnologyBrazil ANP Rule Requires H₂ Leak Sensors on Imported Gas TractorsBrazil ANP rule requires H₂ leak sensors on imported gas tractors from Oct 1, 2026. Learn the compliance impact, IEC 60079-29-1 standard, and what exporters must do now.
 Truck TechnologyTruck Brake System Basics: Components, Failure Risks, and Safety ChecksTruck brake system basics explained: key components, common failure risks, and practical safety checks to improve fleet uptime, compliance, and road safety.
 Truck TechnologySupply Chain Expo Opens With Focus on Heavy Truck Core SystemsHeavy truck core systems take center stage at the Supply Chain Expo, spotlighting battery systems, electric drive axles, and by-wire technologies shaping export opportunities.
 Truck TechnologyTruck Control Unit Failures: Common Symptoms and Fix StrategiesTruck control unit failures often start with small warning signs. Learn key symptoms, root causes, and smart repair strategies to cut downtime and avoid costly misdiagnosis.