What causes a truck injector to fail prematurely?
A truck injector that fails “early” is rarely damaged by age alone. In a workshop, the pattern often starts with a rough idle, hard starting, smoke, poor fuel economy, a cylinder-balance complaint, or a repeat injector fault soon after replacement. The immediate temptation is to replace the injector again. That can restore operation briefly, but it does not remove the condition that caused the failure.
The main causes are contaminated fuel, inadequate filtration, water ingress, fuel-system debris, incorrect installation, electrical or wiring faults, excessive heat, poor fuel quality, and operating conditions that overload the injection system. Before fitting another truck injector, maintenance personnel should establish whether the failed unit was contaminated, mechanically damaged, electrically compromised, or commanded incorrectly. The failure mode usually points toward the real cause.
Start by separating injector failure from an injector-related fault
Not every injector code or misfire symptom means the injector itself has failed. A restricted fuel supply, weak lift pump, air entering the low-pressure circuit, corroded connector pins, damaged wiring, poor engine compression, or an exhaust aftertreatment issue can produce symptoms that resemble injector trouble. Replacing an injector without checking these conditions can create a costly cycle of repeat repairs.
Begin with the engine’s complaint and compare it with the available diagnostic information. Determine whether the fault is isolated to one cylinder, affects a bank of cylinders, or appears under a particular load, temperature, or speed range. A single-cylinder contribution problem may support an injector diagnosis, but a system-wide loss of power or pressure-related code often directs attention to fuel supply, rail pressure control, or fuel contamination instead.
Useful first checks include:
- Read active, pending, and stored fault codes before disconnecting components.
- Inspect fuel filters and drained water separators for water, rust-colored material, dark sediment, or metallic particles.
- Check commanded and actual rail pressure during cranking, idle, and loaded operation where safe and supported by diagnostic equipment.
- Perform cylinder contribution, cutout, or balance testing according to the engine manufacturer’s procedure.
- Inspect the injector harness, connector locks, terminals, and ground paths.
- Measure return-flow or leak-off performance only with the correct approved procedure and equipment.
These checks do not replace teardown or bench testing when required, but they help prevent a diagnosis based only on one symptom or one fault code.
Fuel contamination is the leading cause of premature damage
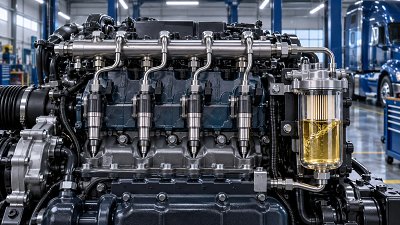
Modern heavy-truck injection systems operate with extremely close internal clearances. The injector’s control valve, needle, nozzle passages, and high-pressure sealing surfaces depend on clean fuel for lubrication and precise metering. Abrasive particles that may appear minor in a fuel sample can score these surfaces, interfere with needle movement, or prevent the control valve from sealing properly.
Contamination may enter from poor fuel storage, damaged tank vents, dirty transfer equipment, deteriorating hoses, an improperly serviced filter housing, or a tank containing sediment. It can also originate inside the vehicle. Corrosion in the tank, degraded fuel lines, a failing transfer pump, or wear debris from a high-pressure pump can circulate through the system.
Metallic debris deserves special attention. If a failed high-pressure pump is shedding material, replacing only the affected injector is usually inadequate. Fine particles can remain in the rail, supply lines, return circuit, tank, and other injectors. The repair scope should follow the engine manufacturer’s contamination procedure. Depending on the system design and inspection findings, this may involve replacing multiple components and thoroughly cleaning or replacing fuel-system sections. Reusing contaminated lines or a dirty tank can quickly destroy replacement parts.
Water does more than trigger a warning light
Water reduces fuel lubricity and promotes corrosion. It can damage precision components, cause sticking, and create rust particles that later circulate through the system. Free water may be visible when a separator is drained, but emulsified water or repeated small amounts can be harder to identify. A water-in-fuel warning should not be dismissed after the warning clears; drain the separator, inspect the fuel condition, and find the entry point.
In cold conditions, water contamination can also contribute to ice formation or restricted fuel flow. The engine may then exhibit hard starting, hesitation, or pressure faults that are blamed on injectors even though the root issue begins upstream.
Fuel filters protect the injector only when the whole service process is clean
A filter changed at the correct interval is helpful, but the service result depends on more than the replacement part. A damaged seal, incorrect filter element, poorly cleaned filter head, reused contaminated fuel, or an opened fuel system exposed to shop dust can defeat the purpose of filtration. Some premature failures follow maintenance because debris entered while lines or fittings were open.
Use the correct filtration specification for the engine, keep replacement filters sealed until installation, clean the filter mounting area before removal, and inspect old filter media when practical. A filter that contains unusual debris is evidence, not waste to be discarded without inspection. It may indicate tank contamination, internal corrosion, or pump wear.
Do not assume that a new fuel filter can correct a contaminated system. A filter may trap part of the debris, but contamination already downstream can remain in the rail or injectors. Likewise, a repeatedly blocked filter is a symptom of a larger problem and should prompt tank and supply-side inspection.
Incorrect installation can damage a replacement injector immediately
Injector installation errors are a common reason a newly fitted unit develops leakage, combustion gas blow-by, poor performance, or electrical faults. The injector may be new or remanufactured, but its service life still depends on the condition of the bore, sealing surfaces, hold-down hardware, fuel connections, and wiring.
Before installation, clean the injector bore and seat with approved tools and methods. Carbon deposits beneath the sealing washer can prevent proper seating. A damaged or uneven seat may allow combustion gases to escape past the injector. Over time, this can create carbon buildup around the injector body, make later removal difficult, alter heat transfer, and contribute to sealing failure.
Follow the specified procedure for new sealing washers, hold-down bolts, clamps, high-pressure pipes, and connector handling. Some systems require replacement of torque-to-yield bolts or high-pressure lines once removed. Reusing parts that are designated for single use may lead to incorrect clamping force, leaks, or fatigue failure. Torque values and tightening sequences matter because injector position and sealing load are controlled by them.
High-pressure fittings must be clean and correctly aligned before tightening. Forcing a line into position can side-load the injector connection or damage the sealing interface. Never attempt to locate a high-pressure fuel leak with fingers or hands while the engine is running; high-pressure fuel can penetrate skin and requires immediate emergency medical treatment.
Coding and calibration data cannot be treated as optional
Many electronically controlled injectors have correction codes that must be entered into the engine control unit after replacement. The code allows the controller to compensate for the injector’s measured flow characteristics. An incorrect code, a code entered for the wrong cylinder, or a skipped coding procedure may lead to rough running, excess smoke, poor balance, or fault codes that look like a defective injector.
Confirm cylinder numbering from the engine documentation rather than relying on assumptions. Record the old injector location, verify the replacement part number, enter the required calibration data accurately, and complete any relearn or adaptation procedure required by the diagnostic system. If the engine still performs poorly after coding, do not repeatedly reprogram it as a substitute for diagnosis; check mechanical, fuel, and electrical conditions.
Electrical problems can imitate internal injector failure
An electronically actuated truck injector relies on a clean, stable electrical command. Heat, vibration, oil intrusion, moisture, and harness chafing can affect connectors and wiring. A high-resistance terminal may pass enough current to behave normally at idle but fail under heat or load. Intermittent faults are particularly likely around harness bends, valve-cover pass-through connectors, and areas exposed to exhaust heat.
Inspect for spread terminals, bent pins, weak connector retention, rubbed insulation, corrosion, and fluid contamination. Check the harness routing after engine or injector work; a harness trapped beneath a cover or pulled too tightly can fail later from vibration. Electrical measurements should be made with specifications appropriate to the injector type. Improvised resistance testing or incorrect test voltage can damage some electronically controlled components or produce misleading readings.
Excessive heat and combustion problems shorten injector life
Injectors live in a high-temperature environment, but abnormal combustion and inadequate cooling can push them beyond their intended operating range. An injector exposed to combustion gas leakage at the seat may develop heavy carbon deposits around the tip or body. Overheating can affect nozzle deposits, internal clearances, electrical components, and sealing materials.
Engine overheating, restricted coolant flow, improper injector seating, incorrect timing-related control inputs, poor air charge, or exhaust restrictions may all contribute to unfavorable combustion temperatures. A truck that works at high load for long periods is not automatically at fault; heavy-duty equipment is designed for demanding service. The concern is a change from normal operating conditions, such as persistent overheating, an air-handling problem, a boost leak, a blocked exhaust path, or a cooling-system defect.
Nozzle coking can also be linked to poor spray quality, unsuitable fuel characteristics, extended idle operation, or repeated short-duty cycles that prevent the engine from reaching stable operating temperature. Deposits may alter the spray pattern, which then worsens combustion and increases deposit formation. Once an injector’s spray pattern is materially affected, chemical treatment alone may not restore its original performance. Confirm the condition through approved testing rather than assuming deposits are the only issue.
Fuel quality and operating habits influence the failure pattern
Fuel that lacks adequate cleanliness, lubricity, or stability can accelerate wear. Long storage periods, temperature cycling, microbial growth, and mixing of unsuitable products can degrade fuel condition. Storage tanks and mobile refueling equipment need the same attention as the truck’s onboard system. A clean vehicle tank can still receive contaminated fuel from a dirty source.
Frequent low-load running and excessive idling do not usually break an injector in isolation, but they can encourage deposits and complicate diagnosis. Conversely, severe load with inadequate maintenance can expose weak filtration, cooling, or fuel-supply problems quickly. Maintenance records should therefore be reviewed alongside the failed part: filter intervals, prior fuel-system repairs, repeat water-separator warnings, cooling complaints, and the timing of the fault relative to refueling or service work can all be relevant.
A practical response when an injector has failed early
Preserve evidence before cleaning everything away. Keep diagnostic records, note the cylinder location, inspect the removed injector externally, and examine drained fuel and filters. Look for black carbon around the injector seat, wet fuel leakage, damaged connector terminals, abnormal deposits, and metallic material. These observations can distinguish a sealing problem from contamination or an electrical issue.
- Confirm the complaint with scan data and basic mechanical checks.
- Inspect fuel quality, water separation, filter condition, and low-pressure supply integrity.
- Check rail-pressure behavior and follow the engine-specific test process for contribution or return flow.
- Inspect the injector harness and connectors before condemning an electronically controlled injector.
- If contamination or metal is found, determine the full repair scope for the fuel system rather than replacing one component.
- Prepare the injector seat carefully, install required new seals and hardware, and follow torque and coding requirements exactly.
- After repair, verify leak-free operation, stable running, correct learned values where applicable, and the absence of returning codes.
A prematurely failed injector is often the first visible casualty of a fuel-system, installation, electrical, or combustion problem. Treating the replacement as the final repair without finding that underlying condition creates repeat downtime and can place the rest of the injection system at risk. The most reliable repair is the one that explains why the injector failed, not merely the one that makes the fault disappear temporarily.
Trending News
- How axle load limits affect low bed trailer exports to Southeast Asia
- How to locate a truck exhaust system leak before replacing parts
- When does heavy equipment transport require a lowboy trailer?
- When does a light commercial vehicle for urban delivery save fleet costs?
- How to choose an off road truck for steep and unstable job sites
Tag
Recommended News
 Truck Parts IndustryWhat causes a truck injector to fail prematurely?Truck injector failure can stem from fuel contamination, water, wiring faults, heat, or incorrect installation. Discover practical diagnostic steps to prevent repeat repairs.
 Truck Parts IndustryEU REACH Rule Takes Effect for Truck Rubber PartsEU REACH Rule takes effect for truck rubber parts exported to the EU. Learn how SCIP reporting, SVHC declarations, and supply chain compliance now impact truck manufacturers and suppliers.
 Truck Parts IndustryHow to Evaluate Commercial Vehicle Parts With Eco-Friendly Materials for Durability and ComplianceCommercial vehicle parts with eco-friendly materials require more than green claims. Learn how to assess durability, compliance, and supplier reliability for smarter sourcing.
 Truck Parts IndustryHow to Evaluate a Truck Parts Supplier Beyond Unit PriceTruck parts supplier selection should go beyond unit price. Learn how to assess quality, traceability, compliance, delivery, and support to reduce fleet risk and total cost.
 Truck Parts IndustryVietnam to Require QR Traceability Labels on Imported Heavy-Truck PartsVietnam to Require QR Traceability Labels on Imported Heavy-Truck Parts from Aug 1, 2026. Learn scope, VNQR-2025 rules, VITRAC links, and how to avoid port refusal and fines.
 Truck Parts IndustryHow to Evaluate a Truck Spare Parts Supplier for Long-Term Cost ControlTruck spare parts supplier selection affects far more than price. Learn how to compare quality, delivery, traceability, and hidden costs to protect fleet uptime and control long-term expenses.
 Truck Parts IndustryFuel Injection Pump Failure Signs and What They Mean for Engine PerformanceFuel injection pump failure signs can quickly reduce truck power, raise fuel use, and trigger hard starts. Learn what each symptom means and when to act before costly downtime.
 Truck Parts IndustryExcavator Attachment Selection for Demolition and Site PrepExcavator attachment selection for demolition and site prep: compare breakers, grapples, crushers, and buckets to boost productivity, safety, and ROI.
 Truck Parts IndustryTruck Engine Overhaul or Replacement: Which Costs Less Long Term?Truck engine overhaul or replacement? Compare long-term cost, downtime, fuel efficiency, and reliability to choose the smarter option for your fleet.
 Truck Parts IndustryHow to Choose Excavator Parts That Last LongerExcavator parts buying guide: learn how to choose excavator parts that last longer by comparing fit, material quality, operating conditions, and supplier reliability.
 Truck Parts IndustryAre Eco-Friendly Commercial Vehicle Parts Durable Enough for Daily Use?Commercial vehicle parts with eco-friendly materials can be durable for daily use—if tested right. Explore where they perform best, key risks, and smarter sourcing insights.
 Truck Parts IndustryTruck Parts OEM vs Aftermarket: Cost, Fit, and Warranty RisksTruck parts OEM vs aftermarket: compare true cost, fit accuracy, and warranty risks to reduce downtime, avoid disputes, and make smarter fleet sourcing decisions.
 Truck Parts IndustryTruck Spare Parts Buying Guide: How to Reduce Downtime and Fitment RiskTruck spare parts buying guide for fleet maintenance teams: learn how to reduce downtime, avoid fitment risk, verify suppliers, and make smarter sourcing decisions.
 Truck Parts IndustryHow to Evaluate a Truck Parts Supplier Beyond PriceTruck parts supplier selection should go beyond price. Learn how to compare quality, delivery, service, and total cost to reduce risk and keep fleets running efficiently.
 Truck Parts IndustryHeavy Truck Parts for Construction: Signs of a Reliable ManufacturerHeavy truck parts manufacturer for construction: learn how to identify reliable suppliers through quality control, traceability, testing, and support to reduce downtime and improve fleet safety.
 Truck Parts IndustryHow to Compare Truck Spare Parts Suppliers on Quality and Lead TimeTruck spare parts supplier comparison starts with quality and lead time. Learn how to assess consistency, delivery reliability, and sourcing fit for smarter purchases.
 Truck Parts IndustryEU REACH Sets PAH Limit for Heavy Truck Rubber PartsEU REACH sets a new PAH limit for heavy truck rubber parts, affecting brake hoses, bushings, and export compliance. Learn what suppliers must prepare now to avoid testing delays and customs risks.
 Truck Parts IndustryWhat to Check in a Truck Chassis Supplier Before Fleet ExpansionTruck chassis supplier selection can make or break fleet expansion. Learn what to check on quality, production, delivery, support, and total cost before requesting a quote.
 Truck Parts IndustryCold Storage Truck Parts That Matter Most for Temperature ControlCommercial vehicle parts for cold storage determine real temperature stability. Discover the key truck components that reduce spoilage, improve efficiency, and protect sensitive cargo.
 Truck Parts IndustryHow to Evaluate a Heavy Truck Parts Manufacturer for Long-Term Supply StabilityHeavy truck parts manufacturer selection starts with supply stability. Learn how to assess quality, capacity, lead times, and risk signals for smarter long-term sourcing.
 Truck Parts IndustryEU EPR Rules Extend to Commercial TrailersEU EPR rules now extend to commercial trailers, bringing new registration, reporting, and fee duties from 2027. See how exporters can prepare early to avoid customs delays.
 Truck Parts IndustryTruck Suspension Problems: Signs, Causes, and Fix OptionsTruck suspension issues can lead to tire wear, poor handling, and costly downtime. Learn the key signs, root causes, and best fix options for different truck applications.
 Truck Parts IndustryHow to Choose a Heavy Truck Parts Manufacturer for Construction FleetsHeavy truck parts manufacturer for construction selection starts with uptime, quality, and delivery. Learn how to compare suppliers, reduce fleet risk, and choose with confidence.
 Truck Parts IndustryUS Sets AEBS Rule for Imported Commercial TrailersUS sets AEBS rule for imported commercial trailers starting Oct. 1, 2026. Learn FMVSS No. 127A, SAE J2929, and key compliance steps to avoid CBP entry denial.
 Truck Parts IndustryHow to Choose Commercial Vehicle Parts That Reduce DowntimeCommercial vehicle parts selection can make or break fleet uptime. Learn how to choose parts that improve fit, quality, supply reliability, and lower total downtime cost.